Dedicated storage R1.0
NOTE: The instructions to setup a StarlingX Cloud with Dedicated Storage with containerized openstack services in this guide are under development. For approved instructions, see the StarlingX Cloud with Dedicated Storage wiki page.
Deployment description
Cloud with Dedicated Storage is the standard StarlingX deployment option with independent controller, compute, and storage nodes.
This deployment option provides the maximum capacity for a single region deployment, with a supported growth path to a multi-region deployment option by adding a secondary region.
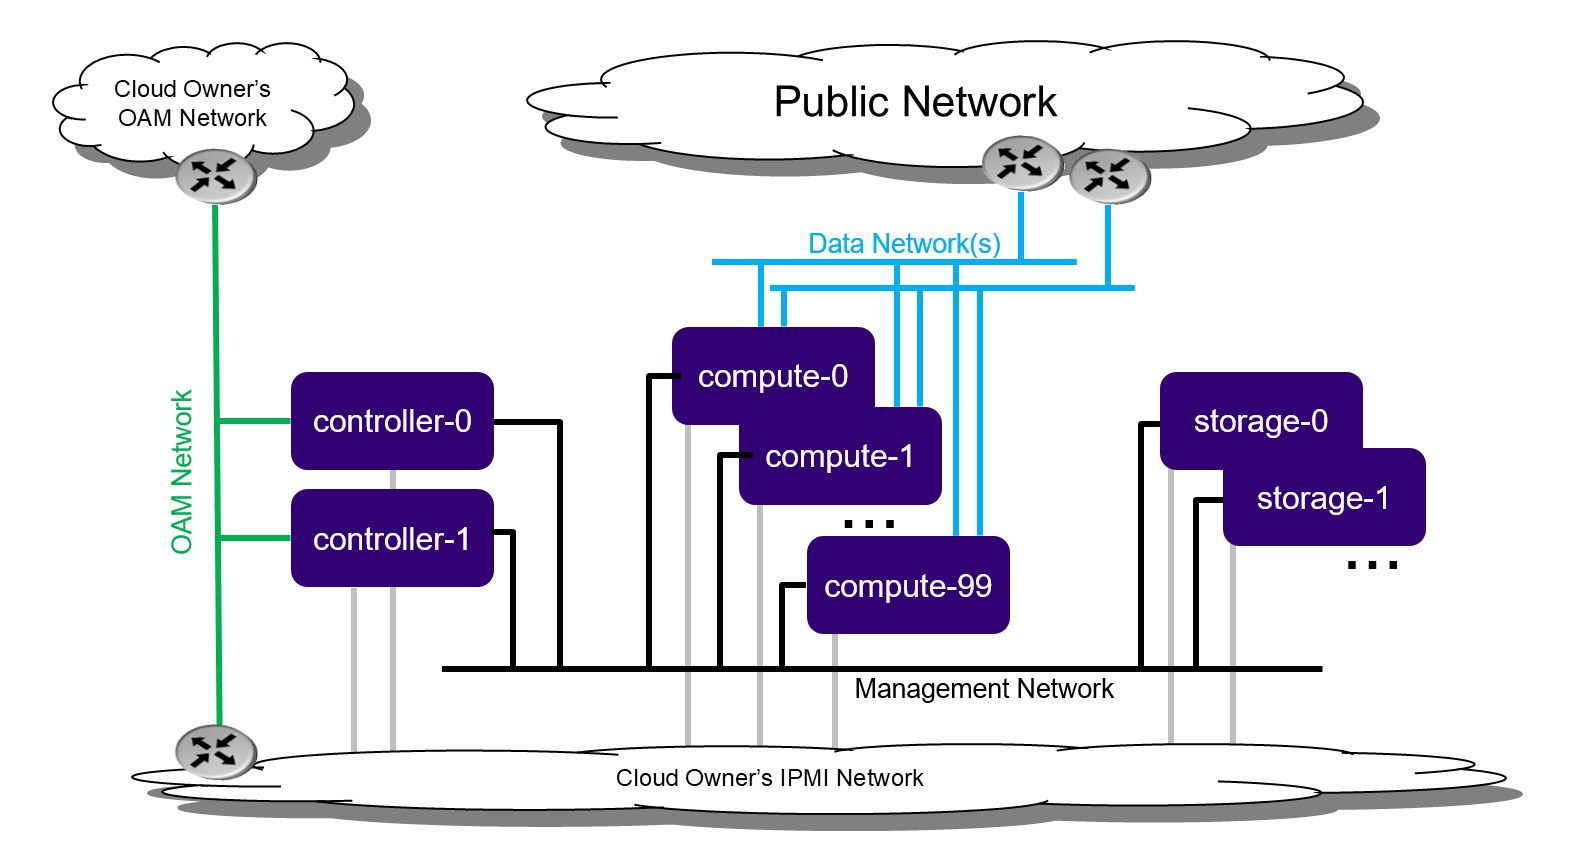
Dedicated Storage deployment configuration
Cloud with Dedicated Storage includes:
2x node HA controller cluster with HA services running across the controller nodes in either active/active or active/standby mode.
Pool of up to 100 compute nodes for hosting virtual machines and virtual networks.
2-9x node HA Ceph storage cluster for hosting virtual volumes, images, and object storage that supports a replication factor of 2 or 3.
Storage nodes are deployed in replication groups of 2 or 3. Replication of objects is done strictly within the replication group.
Supports up to 4 groups of 2x storage nodes, or up to 3 groups of 3x storage nodes.
Preparing dedicated storage servers
Bare metal
Required Servers:
Controllers: 2
Storage
Replication factor of 2: 2 - 8
Replication factor of 3: 3 - 9
Computes: 2 - 100
Hardware requirements
The recommended minimum requirements for the physical servers where Dedicated Storage will be deployed, include:
Minimum processor:
Dual-CPU Intel® Xeon® E5 26xx family (SandyBridge) 8 cores/socket
Memory:
64 GB controller, storage
32 GB compute
BIOS:
Hyper-Threading technology: Enabled
Virtualization technology: Enabled
VT for directed I/O: Enabled
CPU power and performance policy: Performance
CPU C state control: Disabled
Plug & play BMC detection: Disabled
Primary disk:
500 GB SSD or NVMe controller
120 GB (min. 10K RPM) compute and storage
Additional disks:
1 or more 500 GB disks (min. 10K RPM) storage, compute
Network ports*
Management: 10GE controller, storage, compute
OAM: 10GE controller
Data: n x 10GE compute
Virtual environment
Run the libvirt qemu setup scripts. Setting up virtualized OAM and management networks:
$ bash setup_network.sh
Building XML for definition of virtual servers:
$ bash setup_configuration.sh -c dedicatedstorage -i <starlingx iso image>
The default XML server definitions that are created by the previous script are:
dedicatedstorage-controller-0
dedicatedstorage-controller-1
dedicatedstorage-compute-0
dedicatedstorage-compute-1
dedicatedstorage-storage-0
dedicatedstorage-storage-1
Power up a virtual server
To power up a virtual server, run the following command:
$ sudo virsh start <server-xml-name>
e.g.
$ sudo virsh start dedicatedstorage-controller-0
Access virtual server consoles
The XML for virtual servers in stx-tools repo, deployment/libvirt, provides both graphical and text consoles.
Access the graphical console in virt-manager by right-click on the domain (the server) and selecting “Open”.
Access the textual console with the command “virsh console $DOMAIN”, where DOMAIN is the name of the server shown in virsh.
When booting the controller-0 for the first time, both the serial and graphical consoles will present the initial configuration menu for the cluster. One can select serial or graphical console for controller-0. For the other nodes however only serial is used, regardless of which option is selected.
Open the graphic console on all servers before powering them on to observe the boot device selection and PXI boot progress. Run “virsh console $DOMAIN” command promptly after power on to see the initial boot sequence which follows the boot device selection. One has a few seconds to do this.
Installing the controller-0 host
Installing controller-0 involves initializing a host with software and then applying a bootstrap configuration from the command line. The configured bootstrapped host becomes controller-0.
Procedure:
Power on the server that will be controller-0 with the StarlingX ISO on a USB in a bootable USB slot.
Configure the controller using the config_controller script.
Initializing controller-0
This section describes how to initialize StarlingX in host controller-0. Except where noted, all the commands must be executed from a console of the host.
Power on the host to be configured as controller-0, with the StarlingX ISO on a USB in a bootable USB slot. Wait for the console to show the StarlingX ISO booting options:
Standard Controller Configuration
When the installer is loaded and the installer welcome screen appears in the controller-0 host, select the type of installation “Standard Controller Configuration”.
Graphical Console
Select the “Graphical Console” as the console to use during installation.
Standard Security Boot Profile
Select “Standard Security Boot Profile” as the security profile.
Monitor the initialization. When it is complete, a reboot is initiated on the controller-0 host, briefly displays a GNU GRUB screen, and then boots automatically into the StarlingX image.
Log into controller-0 as user wrsroot, with password wrsroot. The first time you log in as wrsroot, you are required to change your password. Enter the current password (wrsroot):
Changing password for wrsroot.
(current) UNIX Password:
Enter a new password for the wrsroot account:
New password:
Enter the new password again to confirm it:
Retype new password:
controller-0 is initialized with StarlingX, and is ready for configuration.
Configuring controller-0
This section describes how to perform the controller-0 configuration interactively just to bootstrap system with minimum critical data. Except where noted, all the commands must be executed from the console of the active controller (here assumed to be controller-0).
When run interactively, the config_controller script presents a series of prompts for initial configuration of StarlingX:
For the virtual environment, you can accept all the default values immediately after ‘system date and time’.
For a physical deployment, answer the bootstrap configuration questions with answers applicable to your particular physical setup.
The script is used to configure the first controller in the StarlingX cluster as controller-0. The prompts are grouped by configuration area. To start the script interactively, use the following command with no parameters:
controller-0:~$ sudo config_controller
System Configuration
================
Enter ! at any prompt to abort...
...
Accept all the default values immediately after ‘system date and time’:
...
Applying configuration (this will take several minutes):

01/08: Creating bootstrap configuration ... DONE
02/08: Applying bootstrap manifest ... DONE
03/08: Persisting local configuration ... DONE
04/08: Populating initial system inventory ... DONE
05:08: Creating system configuration ... DONE
06:08: Applying controller manifest ... DONE
07:08: Finalize controller configuration ... DONE
08:08: Waiting for service activation ... DONE

Configuration was applied

Please complete any out of service commissioning steps with system commands and unlock controller to proceed.
After config_controller bootstrap configuration, REST API, CLI and Horizon interfaces are enabled on the controller-0 OAM IP address. The remaining installation instructions will use the CLI.
Provisioning controller-0 and system
On controller-0, acquire Keystone administrative privileges:
controller-0:~$ source /etc/nova/openrc
Configuring provider networks at installation
You must set up provider networks at installation so that you can attach data interfaces and unlock the compute nodes.
Set up one provider network of the vlan type, named providernet-a:
[wrsroot@controller-0 ~(keystone_admin)]$ neutron providernet-create providernet-a --type=vlan
[wrsroot@controller-0 ~(keystone_admin)]$ neutron providernet-range-create --name providernet-a-range1 --range 100-400 providernet-a
Adding a Ceph storage backend at installation
Add Ceph Storage backend:
[wrsroot@controller-0 ~(keystone_admin)]$ system storage-backend-add ceph -s cinder,glance,swift,nova

WARNING : THIS OPERATION IS NOT REVERSIBLE AND CANNOT BE CANCELLED.

By confirming this operation, Ceph backend will be created.
A minimum of 2 storage nodes are required to complete the configuration.
Please set the 'confirmed' field to execute this operation for the ceph backend.
[wrsroot@controller-0 ~(keystone_admin)]$ system storage-backend-add ceph -s cinder,glance,swift,nova --confirmed

System configuration has changed.
Please follow the administrator guide to complete configuring the system.

+--------------------------------------+------------+---------+-------------+--------------------+----------+...
| uuid                                 | name       | backend | state       | task               | services |...
+--------------------------------------+------------+---------+-------------+--------------------+----------+...
| 48ddb10a-206c-42da-bb3f-f7160a356724 | ceph-store | ceph    | configuring | applying-manifests | cinder,  |...
|                                      |            |         |             |                    | glance,  |...
|                                      |            |         |             |                    | swift    |...
|                                      |            |         |             |                    | nova     |...
|                                      |            |         |             |                    |          |...
| 55f49f86-3e01-4d03-a014-42e1b55ba487 | file-store | file    | configured  | None               | glance   |...
+--------------------------------------+------------+---------+-------------+--------------------+----------+...
Confirm Ceph storage is configured:
[wrsroot@controller-0 ~(keystone_admin)]$ system storage-backend-list
+--------------------------------------+------------+---------+------------+-------------------+-----------+...
| uuid                                 | name       | backend | state      | task              | services  |...
+--------------------------------------+------------+---------+------------+-------------------+-----------+...
| 48ddb10a-206c-42da-bb3f-f7160a356724 | ceph-store | ceph    | configured | provision-storage | cinder,   |...
|                                      |            |         |            |                   | glance,   |...
|                                      |            |         |            |                   | swift     |...
|                                      |            |         |            |                   | nova      |...
|                                      |            |         |            |                   |           |...
| 55f49f86-3e01-4d03-a014-42e1b55ba487 | file-store | file    | configured | None              | glance    |...
+--------------------------------------+------------+---------+------------+-------------------+-----------+...
Unlocking controller-0
You must unlock controller-0 so that you can use it to install the remaining hosts. Use the system host-unlock command:
[wrsroot@controller-0 ~(keystone_admin)]$ system host-unlock controller-0
The host is rebooted. During the reboot, the command line is unavailable, and any ssh connections are dropped. To monitor the progress of the reboot, use the controller-0 console.
Verifying the controller-0 configuration
On controller-0, acquire Keystone administrative privileges:
controller-0:~$ source /etc/nova/openrc
Verify that the StarlingX controller services are running:
[wrsroot@controller-0 ~(keystone_admin)]$ system service-list
+-----+-------------------------------+--------------+----------------+
| id  | service_name                  | hostname     | state          |
+-----+-------------------------------+--------------+----------------+
...
| 1   | oam-ip                        | controller-0 | enabled-active |
| 2   | management-ip                 | controller-0 | enabled-active |
...
+-----+-------------------------------+--------------+----------------+
Verify that controller-0 is unlocked, enabled, and available:
[wrsroot@controller-0 ~(keystone_admin)]$ system host-list
+----+--------------+-------------+----------------+-------------+--------------+
| id | hostname     | personality | administrative | operational | availability |
+----+--------------+-------------+----------------+-------------+--------------+
| 1  | controller-0 | controller  | unlocked       | enabled     | available    |
+----+--------------+-------------+----------------+-------------+--------------+
Provisioning filesystem storage
List the controller file systems with status and current sizes:
[wrsroot@controller-0 ~(keystone_admin)]$ system controllerfs-list
+--------------------------------------+-----------------+------+--------------------+------------+-------+
| UUID                                 | FS Name         | Size | Logical Volume     | Replicated | State |
|                                      |                 | in   |                    |            |       |
|                                      |                 | GiB  |                    |            |       |
+--------------------------------------+-----------------+------+--------------------+------------+-------+
| 4e31c4ea-6970-4fc6-80ba-431fdcdae15f | backup          | 5    | backup-lv          | False      | None  |
| 6c689cd7-2bef-4755-a2fb-ddd9504692f3 | database        | 5    | pgsql-lv           | True       | None  |
| 44c7d520-9dbe-41be-ac6a-5d02e3833fd5 | extension       | 1    | extension-lv       | True       | None  |
| 809a5ed3-22c0-4385-9d1e-dd250f634a37 | glance          | 8    | cgcs-lv            | True       | None  |
| 9c94ef09-c474-425c-a8ba-264e82d9467e | gnocchi         | 5    | gnocchi-lv         | False      | None  |
| 895222b3-3ce5-486a-be79-9fe21b94c075 | img-conversions | 8    | img-conversions-lv | False      | None  |
| 5811713f-def2-420b-9edf-6680446cd379 | scratch         | 8    | scratch-lv         | False      | None  |
+--------------------------------------+-----------------+------+--------------------+------------+-------+
Modify filesystem sizes
[wrsroot@controller-0 ~(keystone_admin)]$ system controllerfs-modify backup=42 database=12 img-conversions=12
Installing controller-1 / storage hosts / compute hosts
After initializing and configuring an active controller, you can add and configure a backup controller and additional compute or storage hosts. For each host do the following:
Initializing host
Power on Host. In host console you will see:
Waiting for this node to be configured.

Please configure the personality for this node from the
controller node in order to proceed.
Updating host name and personality
On controller-0, acquire Keystone administrative privileges:
controller-0:~$ source /etc/nova/openrc
Wait for controller-0 to discover new host, list the host until new UNKNOWN host shows up in table:
[wrsroot@controller-0 ~(keystone_admin)]$ system host-list
+----+--------------+-------------+----------------+-------------+--------------+
| id | hostname     | personality | administrative | operational | availability |
+----+--------------+-------------+----------------+-------------+--------------+
| 1  | controller-0 | controller  | unlocked       | enabled     | available    |
| 2  | None         | None        | locked         | disabled    | offline      |
+----+--------------+-------------+----------------+-------------+--------------+
Use the system host-add to update host personality attribute:
[wrsroot@controller-0 ~(keystone_admin)]$ system host-add -n <controller_name> -p <personality> -m <mac address>
REMARK: use the Mac address for the specific network interface you are going to be connected. e.g. OAM network interface for controller-1 node, management network interface for compute and storage nodes.
Check the NIC MAC address from “Virtual Manager GUI” under “Show virtual hardware details -i” Main Banner –> NIC: –> specific “Bridge name:” under MAC address text field.
Monitoring host
On controller-0, you can monitor the installation progress by running the system host-show command for the host periodically. Progress is shown in the install_state field.
[wrsroot@controller-0 ~(keystone_admin)]$ system host-show <host> | grep install
| install_output      | text                                 |
| install_state       | booting                              |
| install_state_info  | None                                 |
Wait while the host is configured and rebooted. Up to 20 minutes may be required for a reboot, depending on hardware. When the reboot is complete, the host is reported as locked, disabled, and online.
Listing hosts
Once all nodes have been installed, configured and rebooted, on controller-0 list the hosts:
[wrsroot@controller-0 ~(keystone_admin)]$ system host-list
+----+--------------+-------------+----------------+-------------+--------------+
| id | hostname     | personality | administrative | operational | availability |
+----+--------------+-------------+----------------+-------------+--------------+
| 1  | controller-0 | controller  | unlocked       | enabled     | available    |
| 2  | controller-1 | controller  | locked         | disabled    | online       |
| 3  | compute-0    | compute     | locked         | disabled    | online       |
| 4  | compute-1    | compute     | locked         | disabled    | online       |
| 5  | storage-0    | storage     | locked         | disabled    | online       |
| 6  | storage-1    | storage     | locked         | disabled    | online       |
+----+--------------+-------------+----------------+-------------+--------------+
Provisioning controller-1
On controller-0, list hosts:
[wrsroot@controller-0 ~(keystone_admin)]$ system host-list
+----+--------------+-------------+----------------+-------------+--------------+
| id | hostname     | personality | administrative | operational | availability |
+----+--------------+-------------+----------------+-------------+--------------+
...
| 2  | controller-1 | controller  | locked         | disabled    | online       |
...
+----+--------------+-------------+----------------+-------------+--------------+
Provisioning network interfaces on controller-1
In order to list out hardware port names, types, PCI addresses that have been discovered:
[wrsroot@controller-0 ~(keystone_admin)]$ system host-port-list controller-1
Provision the OAM interface for controller-1:
[wrsroot@controller-0 ~(keystone_admin)]$ system host-if-modify -n <oam interface> -c platform --networks oam controller-1 <oam interface>
Unlocking controller-1
Unlock controller-1:
[wrsroot@controller-0 ~(keystone_admin)]$ system host-unlock controller-1
Wait while the controller-1 is rebooted. Up to 10 minutes may be required for a reboot, depending on hardware.
REMARK: controller-1 will remain in degraded state until data-syncing is complete. The duration is dependant on the virtualization host’s configuration - i.e., the number and configuration of physical disks used to host the nodes’ virtual disks. Also, the management network is expected to have link capacity of 10000 (1000 is not supported due to excessive data-sync time). Use ‘fm alarm-list’ to confirm status.
[wrsroot@controller-0 ~(keystone_admin)]$ system host-list
+----+--------------+-------------+----------------+-------------+--------------+
| id | hostname     | personality | administrative | operational | availability |
+----+--------------+-------------+----------------+-------------+--------------+
| 1  | controller-0 | controller  | unlocked       | enabled     | available    |
| 2  | controller-1 | controller  | unlocked       | enabled     | available    |
...
Provisioning storage host
Provisioning storage on a storage host
Available physical disks in storage-N:
[wrsroot@controller-0 ~(keystone_admin)]$ system host-disk-list storage-0
+--------------------------------------+-----------+---------+---------+-------+------------+--------------+...
| uuid                                 | device_no | device_ | device_ | size_ | available_ | rpm          |...
|                                      | de        | num     | type    | gib   | gib        |              |...
+--------------------------------------+-----------+---------+---------+-------+------------+--------------+...
| a2bbfe1f-cf91-4d39-a2e8-a9785448aa56 | /dev/sda  | 2048    | HDD     | 292.  | 0.0        | Undetermined |...
|                                      |           |         |         | 968   |            |              |...
|                                      |           |         |         |       |            |              |...
| c7cc08e6-ff18-4229-a79d-a04187de7b8d | /dev/sdb  | 2064    | HDD     | 100.0 | 99.997     | Undetermined |...
|                                      |           |         |         |       |            |              |...
|                                      |           |         |         |       |            |              |...
| 1ece5d1b-5dcf-4e3c-9d10-ea83a19dd661 | /dev/sdc  | 2080    | HDD     | 4.0   | 3.997      |...
|                                      |           |         |         |       |            |              |...
|                                      |           |         |         |       |            |              |...
+--------------------------------------+-----------+---------+---------+-------+------------+--------------+...
Available storage tiers in storage-N:
[wrsroot@controller-0 ~(keystone_admin)]$ system storage-tier-list ceph_cluster
+--------------------------------------+---------+--------+--------------------------------------+
| uuid                                 | name    | status | backend_using                        |
+--------------------------------------+---------+--------+--------------------------------------+
| 4398d910-75e4-4e99-a57f-fc147fb87bdb | storage | in-use | 5131a848-25ea-4cd8-bbce-0d65c84183df |
+--------------------------------------+---------+--------+--------------------------------------+
Create a storage function (i.e. OSD) in storage-N. At least two unlocked and enabled hosts with monitors are required. Candidates are: controller-0, controller-1, and storage-0.
[wrsroot@controller-0 ~(keystone_admin)]$ system host-stor-add storage-0 c7cc08e6-ff18-4229-a79d-a04187de7b8d
+------------------+--------------------------------------------------+
| Property         | Value                                            |
+------------------+--------------------------------------------------+
| osdid            | 0                                                |
| function         | osd                                              |
| journal_location | 34989bad-67fc-49ea-9e9c-38ca4be95fad             |
| journal_size_gib | 1024                                             |
| journal_path     | /dev/disk/by-path/pci-0000:00:0d.0-ata-2.0-part2 |
| journal_node     | /dev/sdb2                                        |
| uuid             | 34989bad-67fc-49ea-9e9c-38ca4be95fad             |
| ihost_uuid       | 4a5ed4fc-1d2b-4607-acf9-e50a3759c994             |
| idisk_uuid       | c7cc08e6-ff18-4229-a79d-a04187de7b8d             |
| tier_uuid        | 4398d910-75e4-4e99-a57f-fc147fb87bdb             |
| tier_name        | storage                                          |
| created_at       | 2018-08-16T00:39:44.409448+00:00                 |
| updated_at       | 2018-08-16T00:40:07.626762+00:00                 |
+------------------+--------------------------------------------------+
Create remaining available storage function (an OSD) in storage-N based in the number of available physical disks.
List the OSDs:
[wrsroot@controller-0 ~(keystone_admin)]$ system host-stor-list storage-0
+--------------------------------------+----------+-------+--------------+--------------------------------------+
| uuid                                 | function | osdid | capabilities | idisk_uuid                           |
+--------------------------------------+----------+-------+--------------+--------------------------------------+
| 34989bad-67fc-49ea-9e9c-38ca4be95fad | osd      | 0     | {}           | c7cc08e6-ff18-4229-a79d-a04187de7b8d |
+--------------------------------------+----------+-------+--------------+--------------------------------------+
Unlock storage-N:
[wrsroot@controller-0 ~(keystone_admin)]$ system host-unlock storage-0
REMARK: Before you continue, repeat Provisioning Storage steps on remaining storage nodes.
Provisioning a compute host
You must configure the network interfaces and the storage disks on a host before you can unlock it. For each compute host do the following:
On controller-0, acquire Keystone administrative privileges:
controller-0:~$ source /etc/nova/openrc
Provisioning network interfaces on a compute host
On controller-0, in order to list out hardware port names, types, pci-addresses that have been discovered:
Only in virtual environment: Ensure that the interface used is one of those attached to host bridge with model type “virtio” (i.e., eth1000 and eth1001). The model type “e1000” emulated devices will not work for provider networks.
[wrsroot@controller-0 ~(keystone_admin)]$ system host-port-list compute-0
Provision the data interface for compute:
[wrsroot@controller-0 ~(keystone_admin)]$ system host-if-modify -p providernet-a -c data compute-0 eth1000
VSwitch virtual environment
Only in virtual environment. If the compute has more than 4 CPUs, the system will auto-configure the vswitch to use 2 cores. However some virtual environments do not properly support multi-queue required in a multi-CPU environment. Therefore run the following command to reduce the vswitch cores to 1:
[wrsroot@controller-0 ~(keystone_admin)]$ system host-cpu-modify compute-0 -f vswitch -p0 1
+--------------------------------------+-------+-----------+-------+--------+...
| uuid                                 | log_c | processor | phy_c | thread |...
|                                      | ore   |           | ore   |        |...
+--------------------------------------+-------+-----------+-------+--------+...
| a3b5620c-28b1-4fe0-9e97-82950d8582c2 | 0     | 0         | 0     | 0      |...
| f2e91c2b-bfc5-4f2a-9434-bceb7e5722c3 | 1     | 0         | 1     | 0      |...
| 18a98743-fdc4-4c0c-990f-3c1cb2df8cb3 | 2     | 0         | 2     | 0      |...
| 690d25d2-4f99-4ba1-a9ba-0484eec21cc7 | 3     | 0         | 3     | 0      |...
+--------------------------------------+-------+-----------+-------+--------+...
Provisioning storage on a compute host
Review the available disk space and capacity and obtain the uuid(s) of the physical disk(s) to be used for nova local:
[wrsroot@controller-0 ~(keystone_admin)]$ system host-disk-list compute-0
+--------------------------------------+-----------+---------+---------+-------+------------+...
| uuid                                 | device_no | device_ | device_ | size_ | available_ |...
|                                      | de        | num     | type    | gib   | gib        |...
+--------------------------------------+-----------+---------+---------+-------+------------+
| 14e52a55-f6a7-40ad-a0b1-11c2c3b6e7e9 | /dev/sda  | 2048    | HDD     | 292.  | 265.132    |...
| a639914b-23a9-4071-9f25-a5f1960846cc | /dev/sdb  | 2064    | HDD     | 100.0 | 99.997     |...
+--------------------------------------+-----------+---------+---------+-------+------------+...
Create the ‘nova-local’ local volume group:
[wrsroot@controller-0 ~(keystone_admin)]$ system host-lvg-add compute-0 nova-local
+-----------------+-------------------------------------------------------------------+
| Property        | Value                                                             |
+-----------------+-------------------------------------------------------------------+
| lvm_vg_name     | nova-local                                                        |
| vg_state        | adding                                                            |
| uuid            | 37f4c178-f0fe-422d-b66e-24ae057da674                              |
| ihost_uuid      | f56921a6-8784-45ac-bd72-c0372cd95964                              |
| lvm_vg_access   | None                                                              |
| lvm_max_lv      | 0                                                                 |
| lvm_cur_lv      | 0                                                                 |
| lvm_max_pv      | 0                                                                 |
| lvm_cur_pv      | 0                                                                 |
| lvm_vg_size_gib | 0.00                                                              |
| lvm_vg_total_pe | 0                                                                 |
| lvm_vg_free_pe  | 0                                                                 |
| created_at      | 2018-08-16T00:57:46.340454+00:00                                  |
| updated_at      | None                                                              |
| parameters      | {u'concurrent_disk_operations': 2, u'instance_backing': u'image'} |
+-----------------+-------------------------------------------------------------------+
Create a disk partition to add to the volume group based on uuid of the physical disk:
[wrsroot@controller-0 ~(keystone_admin)]$ system host-pv-add compute-0 nova-local a639914b-23a9-4071-9f25-a5f1960846cc
+--------------------------+--------------------------------------------+
| Property                 | Value                                      |
+--------------------------+--------------------------------------------+
| uuid                     | 56fdb63a-1078-4394-b1ce-9a0b3bff46dc       |
| pv_state                 | adding                                     |
| pv_type                  | disk                                       |
| disk_or_part_uuid        | a639914b-23a9-4071-9f25-a5f1960846cc       |
| disk_or_part_device_node | /dev/sdb                                   |
| disk_or_part_device_path | /dev/disk/by-path/pci-0000:00:0d.0-ata-2.0 |
| lvm_pv_name              | /dev/sdb                                   |
| lvm_vg_name              | nova-local                                 |
| lvm_pv_uuid              | None                                       |
| lvm_pv_size_gib          | 0.0                                        |
| lvm_pe_total             | 0                                          |
| lvm_pe_alloced           | 0                                          |
| ihost_uuid               | f56921a6-8784-45ac-bd72-c0372cd95964       |
| created_at               | 2018-08-16T01:05:59.013257+00:00           |
| updated_at               | None                                       |
+--------------------------+--------------------------------------------+
Remote RAW Ceph storage backed will be used to back nova local ephemeral volumes:
[wrsroot@controller-0 ~(keystone_admin)]$ system host-lvg-modify -b remote compute-0 nova-local
Unlocking a compute host
On controller-0, use the system host-unlock command to unlock the compute-N:
[wrsroot@controller-0 ~(keystone_admin)]$ system host-unlock compute-0
Wait while the compute-N is rebooted. Up to 10 minutes may be required for a reboot, depending on hardware. The host is rebooted, and its availability state is reported as in-test, followed by unlocked/enabled.
System health check
Listing StarlingX nodes
On controller-0, after a few minutes, all nodes shall be reported as unlocked, enabled, and available:
[wrsroot@controller-0 ~(keystone_admin)]$ system host-list
+----+--------------+-------------+----------------+-------------+--------------+
| id | hostname     | personality | administrative | operational | availability |
+----+--------------+-------------+----------------+-------------+--------------+
| 1  | controller-0 | controller  | unlocked       | enabled     | available    |
| 2  | controller-1 | controller  | unlocked       | enabled     | available    |
| 3  | compute-0    | compute     | unlocked       | enabled     | available    |
| 4  | compute-1    | compute     | unlocked       | enabled     | available    |
| 5  | storage-0    | storage     | unlocked       | enabled     | available    |
| 6  | storage-1    | storage     | unlocked       | enabled     | available    |
+----+--------------+-------------+----------------+-------------+--------------+
Checking StarlingX Ceph health
[wrsroot@controller-0 ~(keystone_admin)]$ ceph -s
    cluster e14ebfd6-5030-4592-91c3-7e6146b3c910
     health HEALTH_OK
     monmap e1: 3 mons at {controller-0=192.168.204.3:6789/0,controller-1=192.168.204.4:6789/0,storage-0=192.168.204.204:6789/0}
            election epoch 22, quorum 0,1,2 controller-0,controller-1,storage-0
     osdmap e84: 2 osds: 2 up, 2 in
            flags sortbitwise,require_jewel_osds
      pgmap v168: 1600 pgs, 5 pools, 0 bytes data, 0 objects
            87444 kB used, 197 GB / 197 GB avail
                1600 active+clean
controller-0:~$
System alarm list
When all nodes are unlocked, enabled and available: check ‘fm alarm-list’ for issues.
Your StarlingX deployment is now up and running with 2x HA controllers with Cinder storage, 1x compute, 3x storages and all OpenStack services up and running. You can now proceed with standard OpenStack APIs, CLIs and/or Horizon to load Glance images, configure Nova Flavors, configure Neutron networks and launch Nova virtual machines.
Deployment terminology
- Controller node / function
A node that runs cloud control function for managing cloud resources.
Runs cloud control functions for managing cloud resources.
Runs all OpenStack control functions (e.g. managing images, virtual volumes, virtual network, and virtual machines).
Can be part of a two-node HA control node cluster for running control functions either active/active or active/standby.
- Compute ( & network ) node / function
A node that hosts applications in virtual machines using compute resources such as CPU, memory, and disk.
Runs virtual switch for realizing virtual networks.
Provides L3 routing and NET services.
- Storage node / function
A node that contains a set of disks (e.g. SATA, SAS, SSD, and/or NVMe).
Runs CEPH distributed storage software.
Part of an HA multi-node CEPH storage cluster supporting a replication factor of two or three, journal caching, and class tiering.
Provides HA persistent storage for images, virtual volumes (i.e. block storage), and object storage.
- OAM network
The network on which all external StarlingX platform APIs are exposed, (i.e. REST APIs, Horizon web server, SSH, and SNMP), typically 1GE.
Only controller type nodes are required to be connected to the OAM network.
- Management network
A private network (i.e. not connected externally), tipically 10GE, used for the following:
Internal OpenStack / StarlingX monitoring and control.
VM I/O access to a storage cluster.
All nodes are required to be connected to the management network.
- Data network(s)
Networks on which the OpenStack / Neutron provider networks are realized and become the VM tenant networks.
Only compute type and all-in-one type nodes are required to be connected to the data network(s). These node types require one or more interface(s) on the data network(s).
- IPMI network
An optional network on which IPMI interfaces of all nodes are connected. The network must be reachable using L3/IP from the controller’s OAM interfaces.
You can optionally connect all node types to the IPMI network.
- PXEBoot network
An optional network for controllers to boot/install other nodes over the network.
By default, controllers use the management network for boot/install of other nodes in the openstack cloud. If this optional network is used, all node types are required to be connected to the PXEBoot network.
A PXEBoot network is required for a variety of special case situations:
Cases where the management network must be IPv6:
IPv6 does not support PXEBoot. Therefore, IPv4 PXEBoot network must be configured.
Cases where the management network must be VLAN tagged:
Most server’s BIOS do not support PXEBooting over tagged networks. Therefore, you must configure an untagged PXEBoot network.
Cases where a management network must be shared across regions but individual regions’ controllers want to only network boot/install nodes of their own region:
You must configure separate, per-region PXEBoot networks.
- Infra network
A deprecated optional network that was historically used for access to the storage cluster.
If this optional network is used, all node types are required to be connected to the INFRA network,
- Node interfaces
All nodes’ network interfaces can, in general, optionally be either:
Untagged single port.
Untagged two-port LAG and optionally split between redudant L2 switches running vPC (Virtual Port-Channel), also known as multichassis EtherChannel (MEC).
VLAN on either single-port ETH interface or two-port LAG interface.
