Harbor Container Registry
About this task
Harbor is an open-source container registry with a richer and fuller set of capabilities than the built-in StarlingX container registry. StarlingX end users can use Harbor to manage their own application container images. Harbor secures artifacts with policies and role-based access control, can optionally ensure images are scanned and free from vulnerabilities, and can optionally sign images as trusted. Harbor has been evolved to a complete OCI compliant cloud-native artifact registry.
With Harbor V2, you can manage images, manifest lists, Helm charts, CNABs, OPAs and other artifacts adhering to the OCI image specification. It supports operations such as pulling, pushing, deleting, tagging, replicating, and scanning these artifacts. Additionally, you can now sign images and manifest lists.
Harbor also supports the replication of images between registries and offers advanced security features such as user management, access control, and activity auditing.
See https://goharbor.io/docs/2.0.0/ for more details on Harbor.
Harbor Installation
Prerequisites
CephFS backed PVCs are recommended for Harbor such that when configuring multiple replicas, for AIO-DX or Standard configurations, both Harbor replicas can read and write to the registry.
CephRBD backed PVCs (‘general’ storage class) can be used for AIO-SX configurations.
Create a ‘harbor’ K8S Namespace and a K8S secret containing the server certificate for the Harbor Registry as described below:
Generate the server certificate for the Harbor Registry.
Create the certificate for Harbor using Cert-Manager and using the local CA, system-local-ca, as the issuer. Note that the certificate should be created in the
harbor-tls SECRETin the HarborNAMESPACEto be consistent with the helm chart in the application and the overrides in the following procedure.For example:
Create the following Harbor certificate yaml configuration file:
~(keystone_admin)]$ cat <<EOF > harbor-certificate.yaml
---
apiVersion: cert-manager.io/v1
kind: Certificate
metadata:
  name: harbor-certificate
  namespace: harbor
spec:
  secretName: harbor-tls
  issuerRef:
    name: system-local-ca
    kind: ClusterIssuer
  duration: 2160h # 90 days
  renewBefore: 360h # 15 days
  commonName: < oam floating IP Address or FQDN >
  subject:
    organizations:
      - ABC-Company
    organizationalUnits:
      - StarlingX-harbor
  ipAddresses:
  - <oam floating IP address>
  dnsNames:
  - <harbor dns> # e.g. harbor.yourdomian.com
  - <notary dns> # optional, required only if exposed on ingress e.g. notary.yourdomian.com
EOF
Create the Harbor namespace:
~(keystone_admin)]$ kubectl create namespace harbor
Apply the configuration:
~(keystone_admin)]$ kubectl apply -f harbor-certificate.yaml
Verify the configuration:
~(keystone_admin)]$ kubectl get certificate harbor-certificate -n harbor
After successful configuration, the certificate’s Ready status will be True.
Procedure
Locate the Harbor system application tarball in
/usr/local/share/applications/helm.For example:
/usr/local/share/applications/helm/harbor-<version>.tgz
Upload the Harbor application.
~(keystone_admin)]$ system application-upload /usr/local/share/applications/helm/harbor-<version>.tgz
Configure the Helm Overrides for Harbor.
Specify the Harbor configuration to meet your requirements in ‘values.yaml’:
The following example
values.yamlshows different options for some common configuration attributes of Harbor.The commenting in the example below selects NodePort for exposing the Harbor Registry and selects the ‘general’ storage class (CephRBD with ReadWriteOnce accessmode). See discussion of options after example
values.yamlfile listing.expose: # TLS & Certificate Info tls: enabled: true certSource: secret secret: secretName: "harbor-tls" notarySecretName: "harbor-tls" # --- NodePort Option --- (comment if using Ingress) type: nodePort nodePort: name: harbor ports: http: port: 80 nodePort: 30002 https: port: 443 nodePort: 30003 notary: port: 4443 nodePort: 30004 externalURL: https://harbor.yourdomain.com:30003 # --- Ingress Option (uncomment if using ingress) --- # # type: ingress # ingress: # hosts: # core: harbor.yourdomain.com # notary: notary.yourdomain.com # annotations: # kubernetes.io/ingress.class: nginx # nginx.org/client-max-body-size: "0" # externalURL: https://harbor.yourdomain.com # Harbor persistence configuration persistence: enabled: true resourcePolicy: "keep" persistentVolumeClaim: registry: existingClaim: "" subPath: "" size: 100Gi # Adjust registry DB size as required # --- ReadWriteOnce Option (comment if using RWM) --- storageClass: "general" accessMode: ReadWriteOnce # --- ReadWriteMany Option (uncomment if using RWM) --- # storageClass: "cephfs" # accessMode: ReadWriteMany jobservice: jobLog: existingClaim: "" subPath: "" size: 1Gi # --- ReadWriteOnce Option (comment if using RWM) --- storageClass: "general" accessMode: ReadWriteOnce # --- ReadWriteMany Option (uncomment if using RWM) --- # storageClass: "cephfs" # accessMode: ReadWriteManyWhere:
Expose options
NodePort (uncommented in the example above)
To expose Harbor externally using fixed ports (e.g. 30002–30004), if these ports are unavailable, please choose and configure alternative ports that are not in use.
Useful for smaller or single-node AIO-SX configurations.
The main advantage here is that this can be used regardless of whether you have a FQDN for your system or not.
Ingress (commented out in the example above)
This option provides more user friendly/readable URLs for harbor. However, this option is ONLY usable if yourdomain.com and subdomains like harbor.yourdomain.com and notary.yourdomain.com are configured in a DNS server as the OAM FLOATING IP Address of StarlingX.
Persistence options
general (CephRBD) /
ReadWriteOnceUses the CephRBD storage class. Default and typically appropriate for AIO-SX configurations where only a single replica of Harbor would be used.
CephFS /
ReadWriteManyAllows multi-pod access to shared storage. Use for AIO-DX and Standard setups where you would most likely configure Harbor with multiple replicas.
Registry DB Size (
persistence:persistentVolumeClaim:registry:size)Default size, if not specified, is 5 GiB. Increase (e.g. size: 100Gi) based on the expected number and size of images stored.
Note
For all supported attributes, refer to the upstream Harbor Helm chart
values.yamlin https://github.com/goharbor/harbor-helm/blob/v1.12.0/values.yaml.Update the Helm overrides.
~(keystone_admin)]$ system helm-override-update harbor harbor harbor --values values.yaml
Create the Harbor system application with the previously specified helm overrides.
~(keystone_admin)]$ system application-apply harbor
Configure LDAP Authentication for Harbor Registry
Prerequisites
The URL for accessing the Harbor web interface is the
externalURLset in the Helm override above in the step Configure Helm Overrides for Harbor.The default admin username is ‘admin’, and the password is ‘Harbor12345’.
To configure Harbor to use StarlingX Local LDAP for authentication, follow the instructions in Configure LDAP/Active Directory Authentication with the following values.
For StarlingX local LDAP:
LDAP URL: ldap://controller

LDAP search DN: cn=ldapadmin,dc=cgcs,dc=local

LDAP Search Password: <Password of ldapadmin>

LDAP Base DN: dc=cgcs,dc=local

LDAP UID:  cn
You can find <Password of ldapadmin> in /etc/ldap/slapd.conf.backup.
Push an Image to a <project> in Harbor
Note
Depending on your docker setup, you may be required to run all of the following commands with ‘sudo’.
Docker Login.
docker login <harbor_address> -u <username>
Where
<harbor-address>is either:for ‘Ingress’ expose: harbor.yourdomian.com
for ‘NodePort’ expose: https:// <oam-floating-ip>:30003 and
<username>is your actual username
Tag the image.
docker tag redis:latest <harbor_address>/<project>/redis:latest
Push the image.
docker push <harbor_address>/<project>/redis:latest
Pull an Image from Harbor
Use command to pull an image:
docker pull <harbor_address>/<project>/ redis:latest
Where <harbor-address> is either:
for
'Ingress' expose: harbor.yourdomian.comfor
'NodePort' expose: https:// <oam-floating-ip>:30003
Push a Helm Chart as an OCI Object
helm package <Chart_Path>

helm push <chart_package> oci://<harbor_address>/<project>/
Pull a Helm Chart
helm pull oci://<chart_package/<project>/harbor
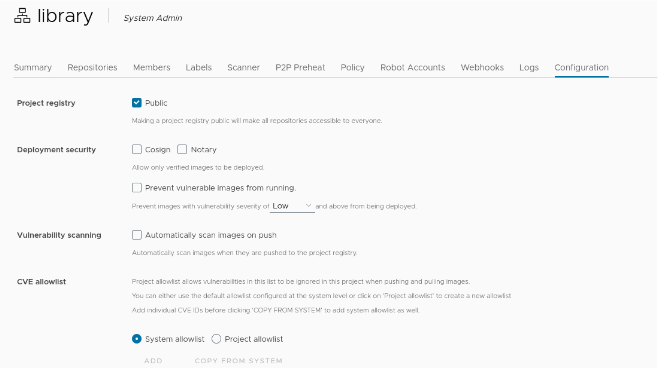
Project Management
A project in Harbor contains all the repositories (images) of a particular application; e.g. the StarlingX project in Harbor would contain all the images from StarlingX.
For more details on creating and configuring a project see: Create Projects and Project Configuration.
Use Images from a Remote Registry
A project in a local Harbor registry can be used as a pull-through cache for a remote registry. For example, a Harbor registry project on a StarlingX Subcloud can be used as a pull-through cache of a Harbor registry project on its StarlingX system controller. This can be achieved using a proxy project which acts as a proxy to the remote registry, or using a replication of the remote registry.
Add a proxy project
Proxy cache allows you to use Harbor to proxy and cache images from a target public or private registry. It does not allow to push the image by the user. Below are the steps to create a proxy project:
Create a registry endpoint. See Creating Replication Endpoints.
Create a new project using the above created registry endpoint. See Configure Proxy Cache.
Add Replication Rule
Setting up pull based replication replicates the images from the remote registry based on a trigger. Trigger can be Manual, scheduled, or event based as shown below.
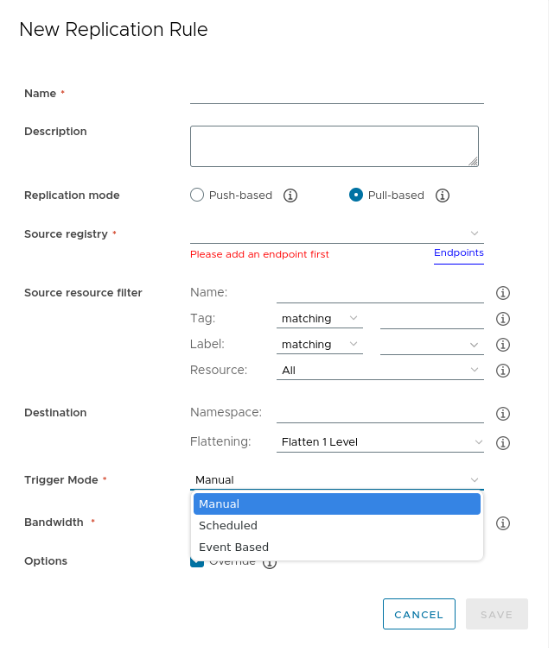
Create a replication endpoint. See Creating Replication Endpoints.
Create a new replication rule with replication mode as
pull basedas describe in Creating a Replication Rule.
Add Users to the Project
You can add individual users to a project, for more details see Assign Users to a Project.
LDAP/AD users can be added to the project.
LDAP/AD groups to projects and assign a role to the group.
You can see the various roles and user permission associated with the roles in User Permissions By Role.
Configure Signed Images Support
For more details see: Implementing Content Trust.
Select cosign or notary for content trust. Harbor will then only allow verified images to be pulled from the project.
Enable content trust by setting the following environment variables on the machine on which you run the Docker client.
export DOCKER_CONTENT_TRUST=1

export DOCKER_CONTENT_TRUST_SERVER=https://<harbor_address>:<notary port[30004]>
If you push the image for the first time, you will be asked to enter the root key passphrase.
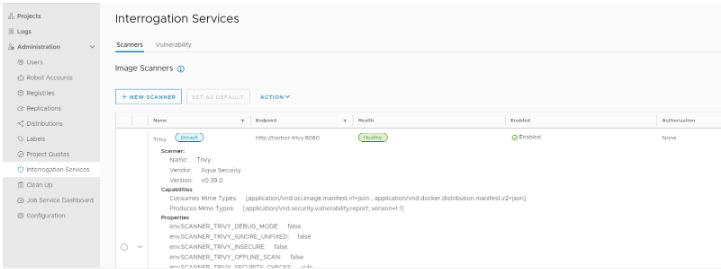
Configure Trivy Scanner Plugin
Trivy is installed and configured as a default scanner.
Enforcement of Image Security Policies Using Portieris
Portieris allows to configure trust policies for an individual namespace or cluster-wide and checks the image against a signed image list on a specified notary server to enforce the configured image policies. An Administrator can enforce StarlingX image security policies using the Portieris admission controller.
It is required to pull from a registry using a docker-registry secret.
Enforcing trust for anonymous image pulls is not supported.
To use portieris, an administrator needs to follow below steps:
Install portieris as specified in Install Portieris.
Configure image policy to allow images from Harbor registry + notary as specified Portieris ClusterImagePolicy and ImagePolicy Configuration. Below example shows the policy allowing image from Harbor registry.
apiVersion: portieris.cloud.ibm.com/v1
kind: ImagePolicy
metadata:
 name: allow-custom
  namespace: harbor
spec:
repositories:
    - name: "<harbor-address>:30003/*"
    policy:
        trust:
        enabled: true
        trustServer: "https://<notary address>:30004" # Optional, custom trust server for repository
Create a SECRET with a Harbor username and password, to use as an ImagePullSecret in a POD spec.
kubectl create secret docker-registry \
-n harbor harbor-registry-secret \
--docker-server=<harbor-address>:port \
--docker-username=admin \
--docker-password=Test@123
Note
If the pod creation with the above secret fails, the user should try with new secret with
--docker-serveras<harbor-address>.Pull a signed image from Harbor registry in a pod using
harbor-secretcreated above. Please note that image policy and pod should be created in the same namespace.apiVersion: v1 kind: Pod metadata: name: test-pod-public spec: containers: - command: - sleep - '3600' image: <harbor-address>:30003/public-demo/redis:latest imagePullPolicy: Always name: test-pod tolerations: - key: "node-role.kubernetes.io/master" operator: "Exists" effect: "NoSchedule" imagePullSecrets: - name: harbor-registry-secret
Limitation
Harbor application cannot be deployed during bootstrap due to the bootstrap deployment dependencies such as early availability of storage class.
