Change the OAM IP Configuration Using Horizon
You can change the External OAM subnet, floating IP address, controller addresses, and default gateway at any time after installation.
During installation, StarlingX is configured with an O|AM network subnet and related IP addresses. You can change these addresses using the Horizon Web interface or the CLI. You can use IPv4 or IPv6 addresses.
Caution
Access to the OAM network is interrupted during this procedure. When a swact is performed on the controllers, the newly active controller uses the changed OAM IP addresses. The existing OAM IP addresses are no longer valid, and you must use the new OAM IP addresses to reconnect to the controller. Changes to external OAM access routing settings may also be required. In addition, VNC console access to worker-node hosts is interrupted until the hosts are locked and unlocked.
Once the OAM IP addresses are changed, any existing server certificates (ssl, docker_registry, OpenStack etc.) that have the old OAM IP addresses in their SANs must be updated with new certificates reflecting the new addresses.
Note
If you are running docker proxy on your system, you need to change the
no_proxy service parameter using the CLI to append the new OAM IP
address. For more information, see Change the OAM IP Configuration
Using the CLI.
Prerequisites
Before changing the OAM IP configuration, review the Fault Management page and ensure that any existing system alarms are cleared.
Procedure
In the StarlingX Horizon, open the System Configuration page.
The System Configuration page is available from Admin > Platform > System Configuration in the left-hand pane.
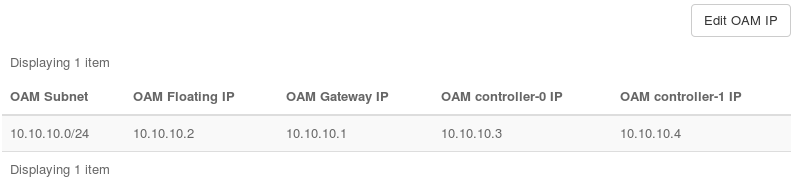
Select the OAM IP tab.
The OAM IP page appears, showing the currently defined OAM network configuration.
Click Edit OAM IP.
The Edit OAM IP dialog box appears.
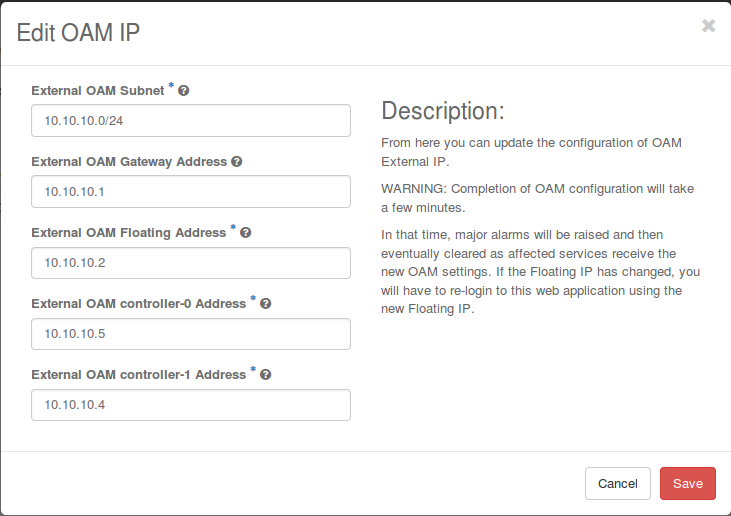
Replace the IP Subnet and/or IP addresses with different ones as required.
Note
If you change the IP address version (IPv4 or IPv6), ensure that the same version is used for the DNS servers (see Specify DNS Servers Using Horizon) and NTP servers (see Configure NTP Servers Using Horizon).
Click Save.
This saves the configuration change and raises Config out-of-date alarms on the controller and worker nodes.
Lock and unlock the standby controller to apply the configuration change.
Open the Host Inventory page, available from Admin > Platform > Host Inventory in the left-hand pane, and then select the Hosts tab.
In the Hosts list, open the drop-down menu for the standby controller, and then click Lock Host.
The host is reported as locked.
Open the drop-down menu for the standby controller, and then click Unlock Host.
Wait until the standby controller is reported as Unlocked, Enabled, and Available.
The Config-out-of-date alarm for this controller is cleared.
Perform a swact to change the active controller.
Open the drop-down menu for the active controller, and then click Swact Host.
Access to the Horizon Web interface is interrupted as control is transferred, and Horizon becomes unresponsive. Both controllers now use IP addresses on the new OAM subnet. To restore Horizon access, you must connect the controllers physically to the new OAM subnet.
Update the system switch configurations or controller interface connections as required to place the controller OAM interfaces on the new OAM subnet.
Reconnect to Horizon using the new OAM floating IP address.
The former active controller is now the standby controller. It is shown with a Config out-of-date alarm.
- Lock and unlock the new standby controller to clear
the Config out-of-date alarm.
Wait until the standby controller is reported as Unlocked, Enabled, and Available.
Results
The worker node Config out-of-date alarms are cleared automatically as the system configuration is updated.
Postrequisites
If alarms are not cleared after a few minutes, lock and unlock the worker nodes to apply any other incomplete configuration changes.
(Optional) If you are running Docker proxy on your system, you need to change the no_proxy service parameter using the CLI to append the new OAM IP. See, Change the OAM IP Configuration Using the CLI.
