Distributed Cloud Installation R5.0
This section describes how to install and configure the StarlingX distributed cloud deployment.
Overview
Distributed cloud configuration supports an edge computing solution by providing central management and orchestration for a geographically distributed network of StarlingX Kubernetes edge systems/clusters.
The StarlingX distributed cloud implements the OpenStack Edge Computing Groups’s MVP Edge Reference Architecture, specifically the “Distributed Control Plane” scenario.
The StarlingX distributed cloud deployment is designed to meet the needs of edge-based data centers with centralized orchestration and independent control planes, and in which Network Function Cloudification (NFC) worker resources are localized for maximum responsiveness. The architecture features:
Centralized orchestration of edge cloud control planes.
Full synchronized control planes at edge clouds (that is, Kubernetes cluster control-plane and worker nodes), with greater benefits for local services, such as:
Reduced network latency.
Operational availability, even if northbound connectivity to the central cloud is lost.
The system supports a scalable number of StarlingX Kubernetes edge systems/clusters, which are centrally managed and synchronized over L3 networks from a central cloud. Each edge system is also highly scalable, from a single node StarlingX Kubernetes deployment to a full standard cloud configuration with controller, worker and storage nodes.
Distributed cloud architecture
A distributed cloud system consists of a central cloud, and one or more subclouds connected to the SystemController region central cloud over L3 networks, as shown in Figure 1.
Central cloud
The central cloud provides a RegionOne region for managing the physical platform of the central cloud and the SystemController region for managing and orchestrating over the subclouds.
RegionOne
In the Horizon GUI, RegionOne is the name of the access mode, or region, used to manage the nodes in the central cloud.
SystemController
In the Horizon GUI, SystemController is the name of the access mode, or region, used to manage the subclouds.
You can use the System Controller to add subclouds, synchronize select configuration data across all subclouds and monitor subcloud operations and alarms. System software updates for the subclouds are also centrally managed and applied from the System Controller.
DNS, NTP, and other select configuration settings are centrally managed at the System Controller and pushed to the subclouds in parallel to maintain synchronization across the distributed cloud.
Subclouds
The subclouds are StarlingX Kubernetes edge systems/clusters used to host containerized applications. Any type of StarlingX Kubernetes configuration, (including simplex, duplex, or standard with or without storage nodes), can be used for a subcloud. The two edge clouds shown in Figure 1 are subclouds.
Alarms raised at the subclouds are sent to the System Controller for central reporting.
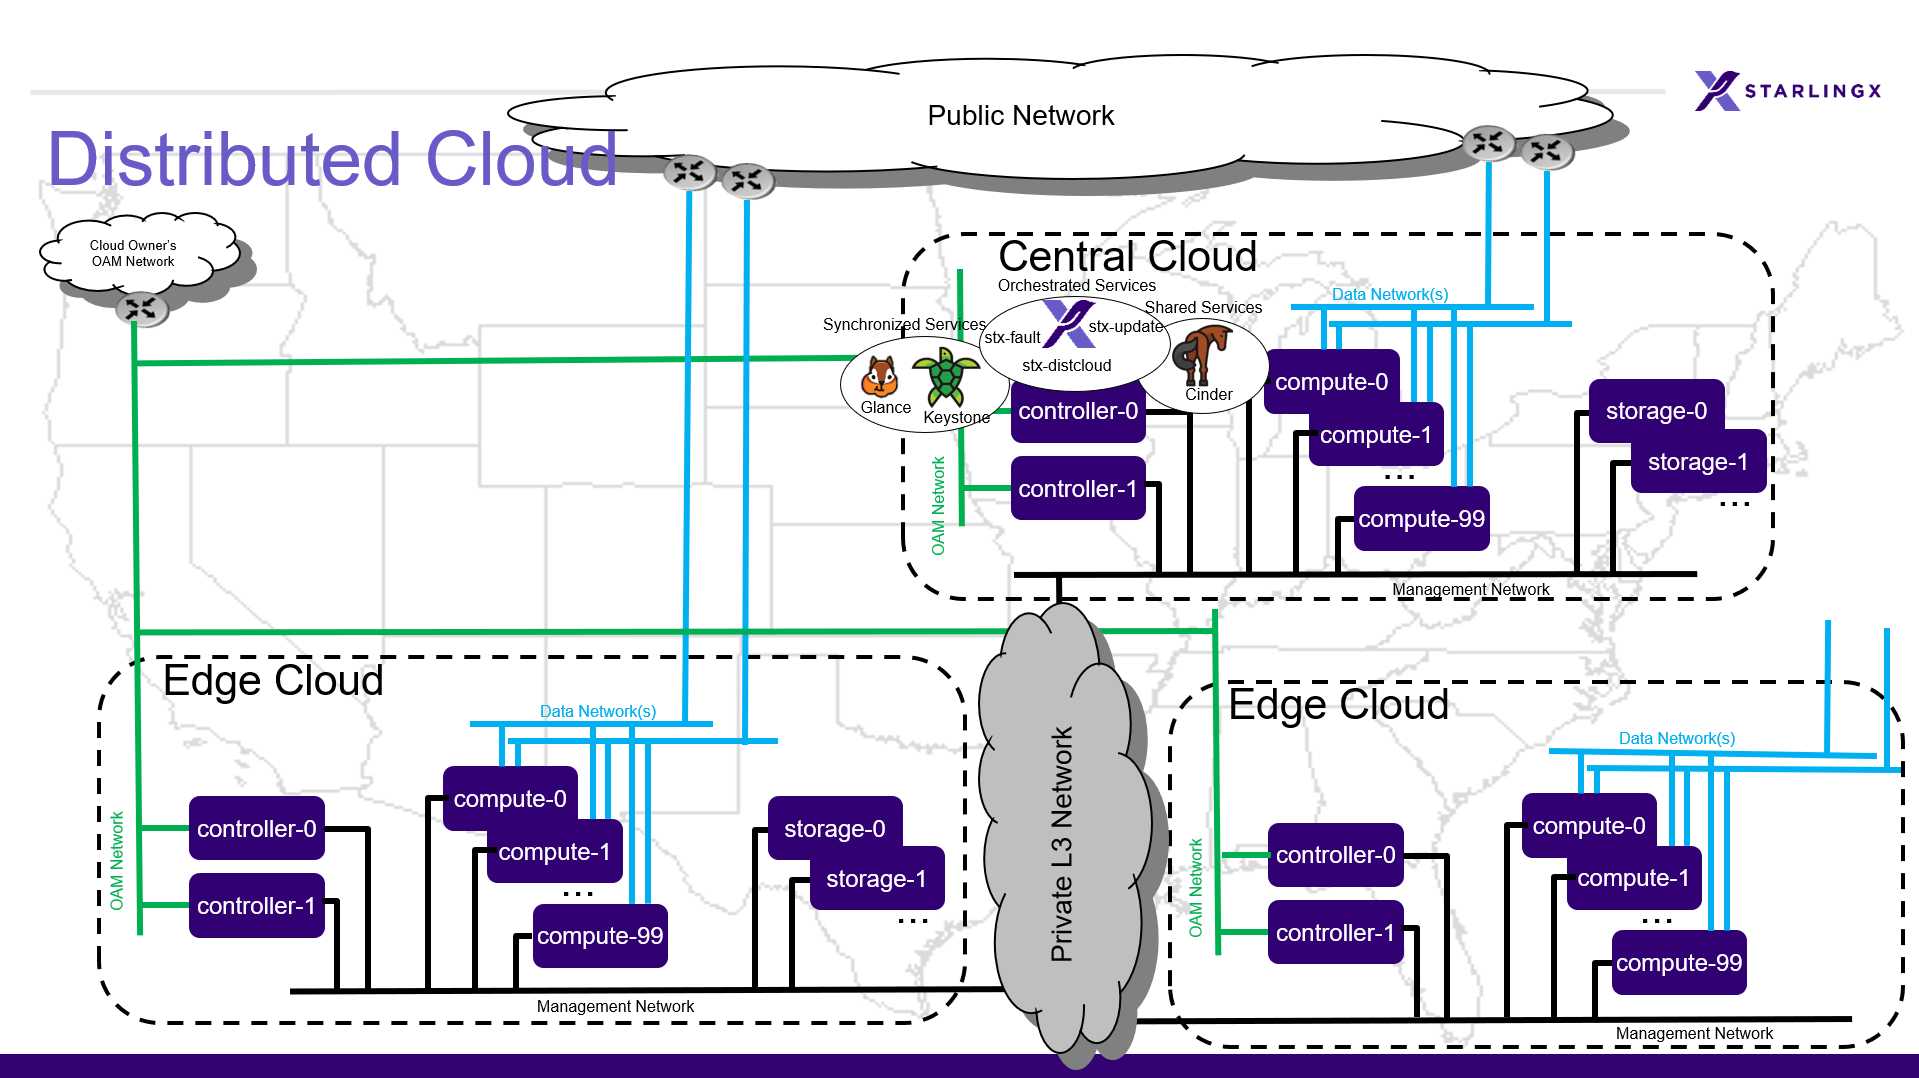
Figure 1: Distributed cloud deployment configuration
Network requirements
Subclouds are connected to the System Controller through both the OAM and the Management interfaces. Because each subcloud is on a separate L3 subnet, the OAM, Management and PXE boot L2 networks are local to the subclouds. They are not connected via L2 to the central cloud, they are only connected via L3 routing. The settings required to connect a subcloud to the System Controller are specified when a subcloud is defined. A gateway router is required to complete the L3 connections, which will provide IP routing between the subcloud Management and OAM IP subnet and the System Controller Management and OAM IP subnet, respectively. The System Controller bootstraps the subclouds via the OAM network, and manages them via the management network. For more information, see the Install a Subcloud section later in this guide.
Note
All messaging between System Controllers and Subclouds uses the admin
REST API service endpoints which, in this distributed cloud environment,
are all configured for secure HTTPS. Certificates for these HTTPS
connections are managed internally by StarlingX.
Install and provision the central cloud
Installing the central cloud is similar to installing a standard StarlingX Kubernetes system. The central cloud supports either an AIO-duplex deployment configuration or a standard with dedicated storage nodes deployment configuration.
To configure controller-0 as a distributed cloud central controller, you must set certain system parameters during the initial bootstrapping of controller-0. Set the system parameter distributed_cloud_role to systemcontroller in the Ansible bootstrap override file. Also, set the management network IP address range to exclude IP addresses reserved for gateway routers providing routing to the subclouds’ management subnets.
Procedure:
Follow the StarlingX R5.0 installation procedures with the extra step noted below:
AIO-duplex: Bare metal All-in-one Duplex Installation R5.0
Standard with dedicated storage nodes: Bare metal Standard with Dedicated Storage Installation R5.0
For the step “Bootstrap system on controller-0”, add the following parameters to the Ansible bootstrap override file.
distributed_cloud_role: systemcontroller
management_start_address: <X.Y.Z.2>
management_end_address: <X.Y.Z.50>
Install a subcloud
At the subcloud location:
Physically install and cable all subcloud servers.
Physically install the top of rack switch and configure it for the required networks.
Physically install the gateway routers which will provide IP routing between the subcloud OAM and Management subnets and the System Controller OAM and management subnets.
On the server designated for controller-0, install the StarlingX Kubernetes software from USB or a PXE Boot server.
Establish an L3 connection to the System Controller by enabling the OAM interface (with OAM IP/subnet) on the subcloud controller using the
config_managementscript. This step is for subcloud ansible bootstrap preparation.Note
This step should not use an interface that uses the MGMT IP/subnet because the MGMT IP subnet will get moved to the loopback address by the Ansible bootstrap playbook during installation.
Be prepared to provide the following information:
Subcloud OAM interface name (for example, enp0s3).
Subcloud OAM interface address, in CIDR format (for example, 10.10.10.12/24).
Note
This must match the external_oam_floating_address supplied in the subcloud’s ansible bootstrap override file.
Subcloud gateway address on the OAM network (for example, 10.10.10.1). A default value is shown.
System Controller OAM subnet (for example, 10,10.10.0/24).
Note
To exit without completing the script, use
CTRL+C. Allow a few minutes for the script to finish.Note
The config_management in the code snippet configures the OAM interface/address/gateway.
$ sudo config_management
Enabling interfaces... DONE
Waiting 120 seconds for LLDP neighbor discovery... Retrieving neighbor details... DONE
Available interfaces:
local interface     remote port
---------------     ----------
enp0s3              08:00:27:c4:6c:7a
enp0s8              08:00:27:86:7a:13
enp0s9              unknown

Enter management interface name: enp0s3
Enter management address CIDR: 10.10.10.12/24
Enter management gateway address [10.10.10.1]:
Enter System Controller subnet: 10.10.10.0/24
Disabling non-management interfaces... DONE
Configuring management interface... DONE
RTNETLINK answers: File exists
Adding route to System Controller... DONE
At the System Controller:
Create a
bootstrap-values.ymloverride file for the subcloud. For example:system_mode: duplex name: "subcloud1" description: "Ottawa Site" location: "YOW" management_subnet: 192.168.101.0/24 management_start_address: 192.168.101.2 management_end_address: 192.168.101.50 management_gateway_address: 192.168.101.1 external_oam_subnet: 10.10.10.0/24 external_oam_gateway_address: 10.10.10.1 external_oam_floating_address: 10.10.10.12 systemcontroller_gateway_address: 192.168.204.101
Important
The management_* entries in the override file are required for all installation types, including AIO-Simplex.
Important
The management_subnet must not overlap with any other subclouds.
Note
The systemcontroller_gateway_address is the address of central cloud management network gateway.
Add the subcloud using the CLI command below:
dcmanager subcloud add --bootstrap-address <ip_address>
--bootstrap-values <config-file>
Where:
<ip_address> is the OAM interface address set earlier on the subcloud.
<config_file> is the Ansible override configuration file,
bootstrap-values.yml, created earlier in step 1.
You will be prompted for the Linux password of the subcloud. This command will take 5- 10 minutes to complete. You can monitor the progress of the subcloud bootstrap through logs:
tail –f /var/log/dcmanager/<subcloud name>_bootstrap_<time stamp>.log
Confirm that the subcloud was deployed successfully:
dcmanager subcloud list

+----+-----------+------------+--------------+---------------+---------+
| id | name      | management | availability | deploy status | sync    |
+----+-----------+------------+--------------+---------------+---------+
| 1  | subcloud1 | unmanaged  | offline      | complete      | unknown |
+----+-----------+------------+--------------+---------------+---------+
Continue provisioning the subcloud system as required using the StarlingX R5.0 Installation procedures and starting from the ‘Configure controller-0’ step.
For AIO-Simplex: Bare metal All-in-one Simplex Installation R5.0
For AIO-Duplex: Bare metal All-in-one Duplex Installation R5.0
For Standard with controller storage: Bare metal Standard with Controller Storage Installation R5.0
For Standard with dedicated storage nodes: Bare metal Standard with Dedicated Storage Installation R5.0
On the active controller for each subcloud:
Add a route from the subcloud to the controller management network to enable the subcloud to go online. For each host in the subcloud:
system host-route-add <host id> <mgmt.interface> \
                      <system controller mgmt.subnet> <prefix> <subcloud mgmt.gateway ip>
For example:
system host-route-add 1 enp0s8 192.168.204.0 24 192.168.101.1
