Install Ironic on StarlingX r9
Overview
Ironic is an OpenStack project that provisions bare metal machines. For information about the Ironic project, see Ironic Documentation.
End user applications can be deployed on bare metal servers (instead of virtual machines) by configuring OpenStack Ironic and deploying a pool of 1 or more bare metal servers.
Note
If you are behind a corporate firewall or proxy, you need to set proxy settings. Refer to Docker Proxy Configuration for details.
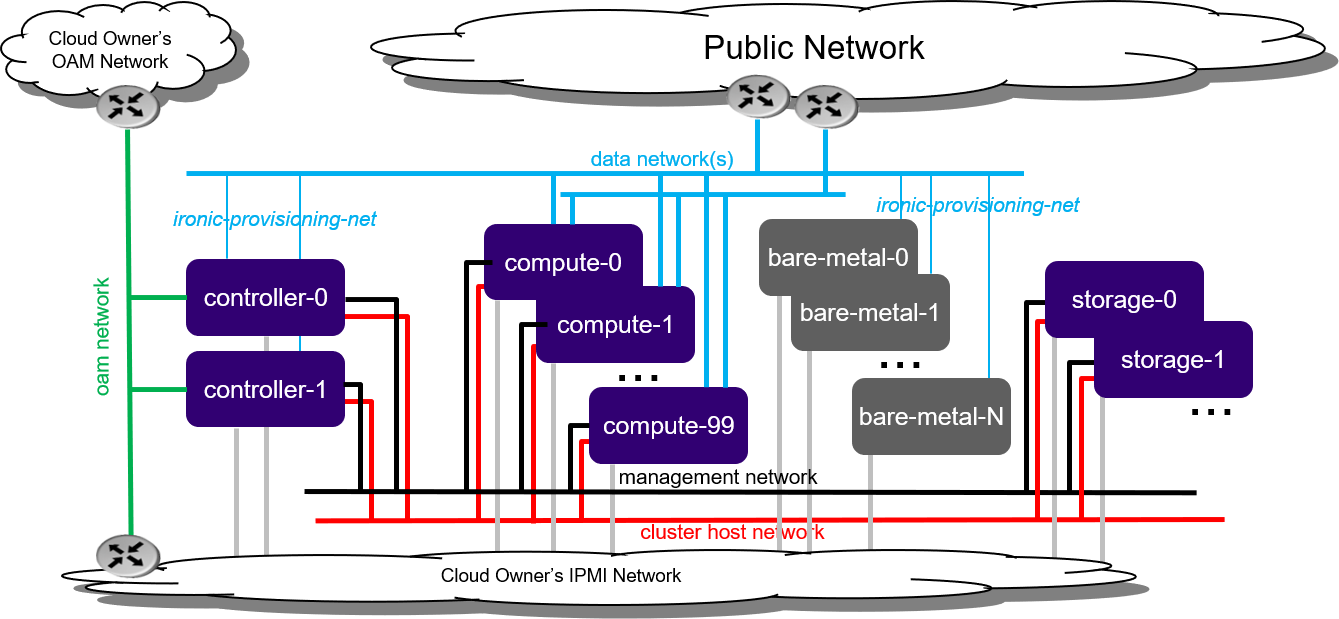
Figure 1: Standard with Ironic deployment configuration
Bare metal servers must be connected to:
IPMI for OpenStack Ironic control
ironic-provisioning-net tenant network via their untagged physical interface, which supports PXE booting
As part of configuring OpenStack Ironic in StarlingX:
An ironic-provisioning-net tenant network must be identified as the boot network for bare metal nodes.
An additional untagged physical interface must be configured on controller nodes and connected to the ironic-provisioning-net tenant network. The OpenStack Ironic tftpboot server will PXE boot the bare metal servers over this interface.
Note
Bare metal servers are NOT:
Running any OpenStack / StarlingX software; they are running end user applications (for example, Glance Images).
To be connected to the internal management network.
Installation
StarlingX currently supports only a bare metal installation of Ironic with a standard configuration, either:
Install Kubernetes Platform on Standard with Controller Storage
Install Kubernetes Platform on Standard with Dedicated Storage
This guide assumes that you have a standard deployment installed and configured with 2x controllers and at least 1x compute-labeled worker node, with the StarlingX OpenStack application (stx-openstack) applied.
Hardware Requirements
This section describes the hardware requirements and server preparation for a StarlingX R7.0 bare metal Ironic deployment configuration.
Minimum hardware requirements
One or more bare metal hosts as Ironic nodes as well as tenant instance node.
BMC support on bare metal host and controller node connectivity to the BMC IP address of bare metal hosts.
For controller nodes:
Additional NIC port on both controller nodes for connecting to the ironic-provisioning-net.
For worker nodes:
If using a flat data network for the Ironic provisioning network, an additional NIC port on one of the worker nodes is required.
Alternatively, use a VLAN data network for the Ironic provisioning network and simply add the new data network to an existing interface on the worker node.
Additional switch ports / configuration for new ports on controller, worker, and Ironic nodes, for connectivity to the Ironic provisioning network.
BMC configuration of Ironic node(s)
Enable BMC and allocate a static IP, username, and password in the BIOS settings. For example, set:
- IP address
10.10.10.126
- username
root
- password
test123
This section describes the steps to install Ironic on a standard configuration, either:
StarlingX R9.0 bare metal Standard with Controller Storage deployment configuration
StarlingX R9.0 bare metal Standard with Dedicated Storage deployment configuration
Enable Ironic service
This section describes the pre-configuration required to enable the Ironic service. All the commands in this section are for the StarlingX platform.
First acquire administrative privileges:
source /etc/platform/openrc
Download Ironic deployment image
The Ironic service requires a deployment image (kernel and ramdisk) which is used to clean Ironic nodes and install the end-user’s image. The cleaning done by the deployment image wipes the disks and tests connectivity to the Ironic conductor on the controller nodes via the Ironic Python Agent (IPA).
The latest Ironic deployment image (Ironic-kernel and Ironic-ramdisk) can be found here:
Configure Ironic network on deployed standard StarlingX
Add an address pool for the Ironic network. This example uses ironic-pool:
system addrpool-add --ranges 10.10.20.1-10.10.20.100 ironic-pool 10.10.20.0 24
Add the Ironic platform network. This example uses ironic-net:
system addrpool-list | grep ironic-pool | awk '{print$2}' | xargs system network-add ironic-net ironic false
Add the Ironic tenant network. This example uses ironic-data:
Note
The tenant network is not the same as the platform network described in the previous step. You can specify any name for the tenant network other than ‘ironic’. If the name ‘ironic’ is used, a user override must be generated to indicate the tenant network name.
Refer to section Generate user Helm overrides for details.
system datanetwork-add ironic-data flat
Configure the new interfaces (for Ironic) on controller nodes and assign them to the platform network. Host must be locked. This example uses the platform network ironic-net that was named in a previous step.
These new interfaces to the controllers are used to connect to the Ironic provisioning network:
controller-0
system interface-network-assign controller-0 enp2s0 ironic-net
system host-if-modify -n ironic -c platform \
--ipv4-mode static --ipv4-pool ironic-pool controller-0 enp2s0

# Apply the OpenStack Ironic node labels
system host-label-assign controller-0 openstack-ironic=enabled

# Unlock the node to apply changes
system host-unlock controller-0
controller-1
system interface-network-assign controller-1 enp2s0 ironic-net
system host-if-modify -n ironic -c platform \
--ipv4-mode static --ipv4-pool ironic-pool controller-1 enp2s0

# Apply the OpenStack Ironic node labels
system host-label-assign controller-1 openstack-ironic=enabled

# Unlock the node to apply changes
system host-unlock controller-1
Configure the new interface (for Ironic) on one of the compute-labeled worker nodes and assign it to the Ironic data network. This example uses the data network ironic-data that was named in a previous step.
system interface-datanetwork-assign worker-0 eno1 ironic-data
system host-if-modify -n ironicdata -c data worker-0 eno1
Generate user Helm overrides
Ironic Helm Charts are included in the stx-openstack application. By default, Ironic is disabled.
To enable Ironic, update the following Ironic Helm Chart attributes:
system helm-override-update stx-openstack ironic openstack --set network.pxe.neutron_subnet_alloc_start=10.10.20.10 --set network.pxe.neutron_subnet_gateway=10.10.20.1 --set network.pxe.neutron_provider_network=ironic-data
network.pxe.neutron_subnet_alloc_start sets the DHCP start IP to Neutron for Ironic node provision, and reserves several IPs for the platform.
If the data network name for Ironic is changed, modify network.pxe.neutron_provider_network to the command above:
--set network.pxe.neutron_provider_network=ironic-data
Apply OpenStack application
Re-apply the stx-openstack application to apply the changes to Ironic:
system helm-chart-attribute-modify stx-openstack ironic openstack --enabled true

system application-apply stx-openstack
Start an Ironic node
All the commands in this section are for the OpenStack application with administrative privileges.
From a new shell as a root user, without sourcing /etc/platform/openrc:
mkdir -p /etc/openstack

tee /etc/openstack/clouds.yaml << EOF
clouds:
  openstack_helm:
    region_name: RegionOne
    identity_api_version: 3
    endpoint_type: internalURL
    auth:
      username: 'admin'
      password: 'St8rlingXCloud*'
      project_name: 'admin'
      project_domain_name: 'default'
      user_domain_name: 'default'
      auth_url: 'http://keystone.openstack.svc.cluster.local/v3'
EOF

export OS_CLOUD=openstack_helm
Create Glance images
Create the ironic-kernel image:
openstack image create \
--file ~/coreos_production_pxe-stable-stein.vmlinuz \
--disk-format aki \
--container-format aki \
--public \
ironic-kernel
Create the ironic-ramdisk image:
openstack image create \
--file ~/coreos_production_pxe_image-oem-stable-stein.cpio.gz \
--disk-format ari \
--container-format ari \
--public \
ironic-ramdisk
Create the end user application image (for example, CentOS):
openstack image create \
--file ~/CentOS-7-x86_64-GenericCloud-root.qcow2 \
--public --disk-format \
qcow2 --container-format bare centos
Create an Ironic node
Create a node:
openstack baremetal node create --driver ipmi --name ironic-test0
Add IPMI information:
openstack baremetal node set \
--driver-info ipmi_address=10.10.10.126 \
--driver-info ipmi_username=root \
--driver-info ipmi_password=test123 \
--driver-info ipmi_terminal_port=623 ironic-test0
Set ironic-kernel and ironic-ramdisk images driver information, on this bare metal node:
openstack baremetal node set \
--driver-info deploy_kernel=$(openstack image list | grep ironic-kernel | awk '{print$2}') \
--driver-info deploy_ramdisk=$(openstack image list | grep ironic-ramdisk | awk '{print$2}') \
ironic-test0
Set resource properties on this bare metal node based on actual Ironic node capacities:
openstack baremetal node set \
--property cpus=4 \
--property cpu_arch=x86_64\
--property capabilities="boot_option:local" \
--property memory_mb=65536 \
--property local_gb=400 \
--resource-class bm ironic-test0
Add pxe_template location:
openstack baremetal node set --driver-info \
pxe_template='/var/lib/openstack/lib64/python2.7/site-packages/ironic/drivers/modules/ipxe_config.template' \
ironic-test0
Create a port to identify the specific port used by the Ironic node. Substitute a4:bf:01:2b:3b:c8 with the MAC address for the Ironic node port which connects to the Ironic network:
openstack baremetal port create \
--node $(openstack baremetal node list | grep ironic-test0 | awk '{print$2}') \
--pxe-enabled true a4:bf:01:2b:3b:c8
Change node state to manage:
openstack baremetal node manage ironic-test0
Make node available for deployment:
openstack baremetal node provide ironic-test0
Wait for ironic-test0 provision-state: available:
openstack baremetal node show ironic-test0
Deploy an instance on Ironic node
All the commands in this section are for the OpenStack application, but this time with tenant specific privileges.
From a new shell as a root user, without sourcing
/etc/platform/openrc:mkdir -p /etc/openstack tee /etc/openstack/clouds.yaml << EOF clouds: openstack_helm: region_name: RegionOne identity_api_version: 3 endpoint_type: internalURL auth: username: 'joeuser' password: 'mypasswrd' project_name: 'intel' project_domain_name: 'default' user_domain_name: 'default' auth_url: 'http://keystone.openstack.svc.cluster.local/v3' EOF export OS_CLOUD=openstack_helm
Create flavor.
Set resource CUSTOM_BM corresponding to –resource-class bm:
openstack flavor create --ram 4096 --vcpus 4 --disk 400 \
--property resources:CUSTOM_BM=1 \
--property resources:VCPU=0 \
--property resources:MEMORY_MB=0 \
--property resources:DISK_GB=0 \
--property capabilities:boot_option='local' \
bm-flavor
See Adding scheduling information and Configure Nova flavors for more information.
Enable service
List the compute services:
openstack compute service list
Set compute service properties:
openstack compute service set --enable controller-0 nova-compute
Create instance
Note
The keypair create command is optional. It is not required to enable a bare metal instance.
openstack keypair create --public-key ~/.ssh/id_rsa.pub mykey
Create 2 new servers, one bare metal and one virtual:
openstack server create --image centos --flavor bm-flavor \
--network baremetal --key-name mykey bm

openstack server create --image centos --flavor m1.small \
--network baremetal --key-name mykey vm
