Bare metal All-in-one Simplex R2.0
Description
The All-in-one Simplex (AIO-SX) deployment option provides all three cloud functions (controller, compute, and storage) on a single server.
An AIO-SX configuration provides the following benefits:
Only a small amount of cloud processing and storage power is required
Application consolidation using multiple virtual machines on a single pair of physical servers
A storage backend solution using a single-node CEPH deployment
An AIO-SX deployment provides no protection against overall server hardware fault, as protection is either not required or provided at a higher level. Hardware component protection can be enable with, for example, a hardware RAID or 2x Port LAG in the deployment.
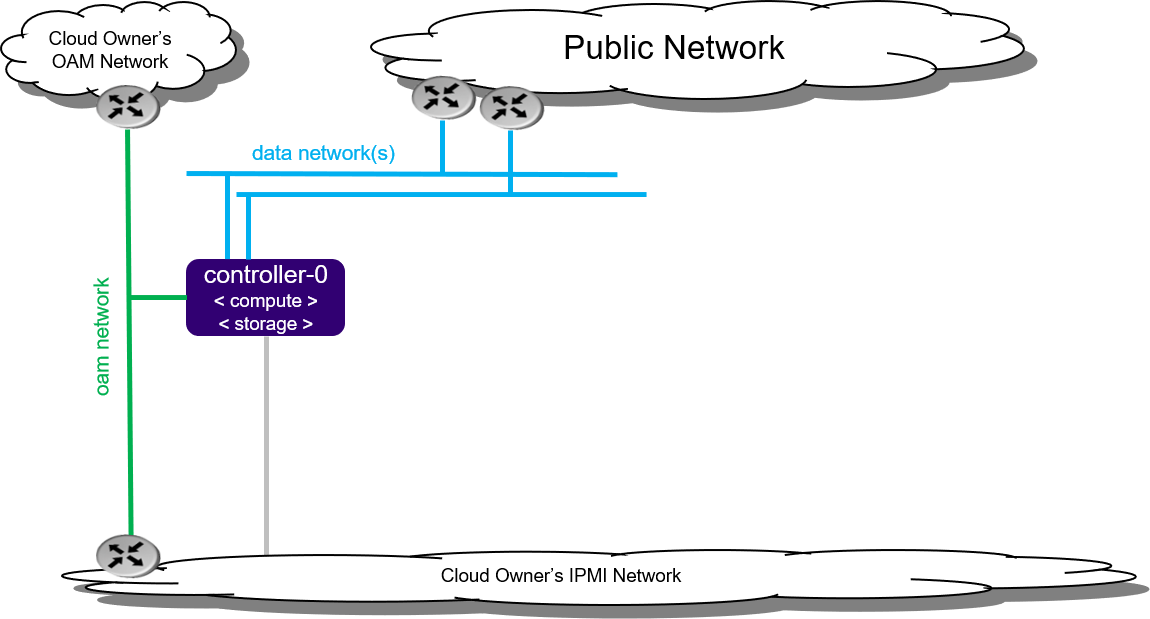
Figure 1: All-in-one Simplex deployment configuration
Note
By default, StarlingX uses IPv4. To use StarlingX with IPv6:
The entire infrastructure and cluster configuration must be IPv6, with the exception of the PXE boot network.
Not all external servers are reachable via IPv6 addresses (e.g. Docker registries). Depending on your infrastructure, it may be necessary to deploy a NAT64/DNS64 gateway to translate the IPv4 addresses to IPv6.
Hardware requirements
The recommended minimum requirements for the bare metal servers for the various host types are:
Minimum Requirement |
All-in-one Controller Node |
|---|---|
Number of Servers |
1 |
Minimum Processor Class |
or
|
Minimum Memory |
64 GB |
Primary Disk |
500 GB SDD or NVMe |
Additional Disks |
|
Minimum Network Ports |
|
BIOS Settings |
|
Preparing the servers
Prior to starting the StarlingX installation, the bare metal servers must be in the following condition:
Physically installed
Cabled for power
Cabled for networking
Far-end switch ports should be properly configured to realize the networking shown in Figure 1.
All disks wiped
Ensures that servers will boot from either the network or USB storage (if present)
Powered off
StarlingX Kubernetes
Installing StarlingX Kubernetes
Create a bootable USB with the StarlingX ISO
Create a bootable USB with the StarlingX ISO.
Refer to Create Bootable USB for instructions on how to create a bootable USB on your system.
Install software on controller-0
Insert the bootable USB into a bootable USB port on the host you are configuring as controller-0.
Power on the host.
Attach to a console, ensure the host boots from the USB, and wait for the StarlingX Installer Menus.
Make the following menu selections in the installer:
First menu: Select ‘Standard Controller Configuration’
Second menu: Select ‘Graphical Console’ or ‘Textual Console’ depending on your terminal access to the console port
Third menu: Select ‘Standard Security Profile’
Wait for non-interactive install of software to complete and server to reboot. This can take 5-10 minutes, depending on the performance of the server.
Bootstrap system on controller-0
Login using the username / password of “sysadmin” / “sysadmin”. When logging in for the first time, you will be forced to change the password.
Login: sysadmin
Password:
Changing password for sysadmin.
(current) UNIX Password: sysadmin
New Password:
(repeat) New Password:
External connectivity is required to run the Ansible bootstrap playbook. The StarlingX boot image will DHCP out all interfaces so the server may have obtained an IP address and have external IP connectivity if a DHCP server is present in your environment. Verify this using the ip add and ping 8.8.8.8 commands.
Otherwise, manually configure an IP address and default IP route. Use the PORT, IP-ADDRESS/SUBNET-LENGTH and GATEWAY-IP-ADDRESS applicable to your deployment environment.
sudo ip address add <IP-ADDRESS>/<SUBNET-LENGTH> dev <PORT>
sudo ip link set up dev <PORT>
sudo ip route add default via <GATEWAY-IP-ADDRESS> dev <PORT>
ping 8.8.8.8
Specify user configuration overrides for the Ansible bootstrap playbook.
Ansible is used to bootstrap StarlingX on controller-0:
The default Ansible inventory file,
/etc/ansible/hosts, contains a single host: localhost.The Ansible bootstrap playbook is at:
/usr/share/ansible/stx-ansible/playbooks/bootstrap/bootstrap.ymlThe default configuration values for the bootstrap playbook are in:
/usr/share/ansible/stx-ansible/playbooks/bootstrap/host_vars/default.ymlBy default Ansible looks for and imports user configuration override files for hosts in the sysadmin home directory ($HOME), for example:
OME/<hostname>.yml
Specify the user configuration override file for the ansible bootstrap playbook, by either:
Copying the default.yml file listed above to
$HOME/localhost.ymland editing the configurable values as desired, based on the commented instructions in the file.
or
Creating the minimal user configuration override file as shown in the example below, using the OAM IP SUBNET and IP ADDRESSing applicable to your deployment environment:
cd ~
cat <<EOF > localhost.yml
system_mode: standard

dns_servers:
  - 8.8.8.8
  - 8.8.4.4

external_oam_subnet: <OAM-IP-SUBNET>/<OAM-IP-SUBNET-LENGTH>
external_oam_gateway_address: <OAM-GATEWAY-IP-ADDRESS>
external_oam_floating_address: <OAM-FLOATING-IP-ADDRESS>
external_oam_node_0_address: <OAM-CONTROLLER-0-IP-ADDRESS>
external_oam_node_1_address: <OAM-CONTROLLER-1-IP-ADDRESS>

admin_username: admin
admin_password: <sysadmin-password>
ansible_become_pass: <sysadmin-password>
EOF
If you are using IPv6, provide IPv6 configuration overrides. Note that all addressing, except pxeboot_subnet, should be updated to IPv6 addressing. Example IPv6 override values are shown below:
dns_servers:
‐ 2001:4860:4860::8888
‐ 2001:4860:4860::8844
pxeboot_subnet: 169.254.202.0/24
management_subnet: 2001:db8:2::/64
cluster_host_subnet: 2001:db8:3::/64
cluster_pod_subnet: 2001:db8:4::/64
cluster_service_subnet: 2001:db8:4::/112
external_oam_subnet: 2001:db8:1::/64
external_oam_gateway_address: 2001:db8::1
external_oam_floating_address: 2001:db8::2
external_oam_node_0_address: 2001:db8::3
external_oam_node_1_address: 2001:db8::4
management_multicast_subnet: ff08::1:1:0/124
Note that the external_oam_node_0_address, and external_oam_node_1_address parameters are not required for the AIO‐SX installation.
Run the Ansible bootstrap playbook:
ansible-playbook /usr/share/ansible/stx-ansible/playbooks/bootstrap/bootstrap.yml
Wait for Ansible bootstrap playbook to complete. This can take 5-10 minutes, depending on the performance of the host machine.
Configure controller-0
Acquire admin credentials:
source /etc/platform/openrc
Configure the OAM and MGMT interfaces of controller-0 and specify the attached networks. Use the OAM and MGMT port names, e.g. eth0, applicable to your deployment environment.
OAM_IF=<OAM-PORT>
MGMT_IF=<MGMT-PORT>
system host-if-modify controller-0 lo -c none
IFNET_UUIDS=$(system interface-network-list controller-0 | awk '{if ($6=="lo") print $4;}')
for UUID in $IFNET_UUIDS; do
    system interface-network-remove ${UUID}
done
system host-if-modify controller-0 $OAM_IF -c platform
system interface-network-assign controller-0 $OAM_IF oam
system host-if-modify controller-0 $MGMT_IF -c platform
system interface-network-assign controller-0 $MGMT_IF mgmt
system interface-network-assign controller-0 $MGMT_IF cluster-host
Configure NTP Servers for network time synchronization:
system ntp-modify ntpservers=0.pool.ntp.org,1.pool.ntp.org
Configure data interfaces for controller-0. Use the DATA port names, e.g. eth0, applicable to your deployment environment.
Note
This step is required for OpenStack and optional for Kubernetes. For example, do this step if using SRIOV network attachments in application containers.
For Kubernetes SRIOV network attachments:
Configure the SRIOV device plugin
system host-label-assign controller-0 sriovdp=enabled
If planning on running DPDK in containers on this host, configure the number of 1G Huge pages required on both NUMA nodes.
system host-memory-modify controller-0 0 -1G 100
system host-memory-modify controller-0 1 -1G 100
For both Kubernetes and OpenStack:
DATA0IF=<DATA-0-PORT>
DATA1IF=<DATA-1-PORT>
export COMPUTE=controller-0
PHYSNET0='physnet0'
PHYSNET1='physnet1'
SPL=/tmp/tmp-system-port-list
SPIL=/tmp/tmp-system-host-if-list
system host-port-list ${COMPUTE} --nowrap > ${SPL}
system host-if-list -a ${COMPUTE} --nowrap > ${SPIL}
DATA0PCIADDR=$(cat $SPL | grep $DATA0IF |awk '{print $8}')
DATA1PCIADDR=$(cat $SPL | grep $DATA1IF |awk '{print $8}')
DATA0PORTUUID=$(cat $SPL | grep ${DATA0PCIADDR} | awk '{print $2}')
DATA1PORTUUID=$(cat $SPL | grep ${DATA1PCIADDR} | awk '{print $2}')
DATA0PORTNAME=$(cat $SPL | grep ${DATA0PCIADDR} | awk '{print $4}')
DATA1PORTNAME=$(cat  $SPL | grep ${DATA1PCIADDR} | awk '{print $4}')
DATA0IFUUID=$(cat $SPIL | awk -v DATA0PORTNAME=$DATA0PORTNAME '($12 ~ DATA0PORTNAME) {print $2}')
DATA1IFUUID=$(cat $SPIL | awk -v DATA1PORTNAME=$DATA1PORTNAME '($12 ~ DATA1PORTNAME) {print $2}')

system datanetwork-add ${PHYSNET0} vlan
system datanetwork-add ${PHYSNET1} vlan

system host-if-modify -m 1500 -n data0 -c data ${COMPUTE} ${DATA0IFUUID}
system host-if-modify -m 1500 -n data1 -c data ${COMPUTE} ${DATA1IFUUID}
system interface-datanetwork-assign ${COMPUTE} ${DATA0IFUUID} ${PHYSNET0}
system interface-datanetwork-assign ${COMPUTE} ${DATA1IFUUID} ${PHYSNET1}
Add an OSD on controller-0 for ceph:
echo ">>> Add OSDs to primary tier"
system host-disk-list controller-0
system host-disk-list controller-0 | awk '/\/dev\/sdb/{print $2}' | xargs -i system host-stor-add controller-0 {}
system host-stor-list controller-0
OpenStack-specific host configuration
Warning
The following configuration is required only if the StarlingX OpenStack application (stx-openstack) will be installed.
For OpenStack only: Assign OpenStack host labels to controller-0 in support of installing the stx-openstack manifest and helm-charts later.
system host-label-assign controller-0 openstack-control-plane=enabled
system host-label-assign controller-0 openstack-compute-node=enabled
system host-label-assign controller-0 openvswitch=enabled
system host-label-assign controller-0 sriov=enabled
For OpenStack only: Configure the system setting for the vSwitch.
StarlingX has OVS (kernel-based) vSwitch configured as default:
Running in a container; defined within the helm charts of stx-openstack manifest.
Shares the core(s) assigned to the platform.
If you require better performance, OVS-DPDK should be used:
Running directly on the host (i.e. NOT containerized).
Requires that at least 1 core be assigned/dedicated to the vSwitch function.
To deploy the default containerized OVS:
system modify --vswitch_type none
Do not run any vSwitch directly on the host, instead, use the containerized OVS defined in the helm charts of stx-openstack manifest.
To deploy OVS-DPDK (OVS with the Data Plane Development Kit, which is supported only on bare metal hardware, run the following command:
system modify --vswitch_type ovs-dpdk
system host-cpu-modify -f vswitch -p0 1 controller-0
Once vswitch_type is set to OVS-DPDK, any subsequent nodes created will default to automatically assigning 1 vSwitch core for AIO controllers and 2 vSwitch cores for computes.
When using OVS-DPDK, virtual machines must be configured to use a flavor with property: hw:mem_page_size=large
Note
After controller-0 is unlocked, changing vswitch_type would require locking and unlocking all computes (and/or AIO Controllers) in order to apply the change.
For OpenStack only: Set up disk partition for nova-local volume group, which is needed for stx-openstack nova ephemeral disks.
export COMPUTE=controller-0

echo ">>> Getting root disk info"
ROOT_DISK=$(system host-show ${COMPUTE} | grep rootfs | awk '{print $4}')
ROOT_DISK_UUID=$(system host-disk-list ${COMPUTE} --nowrap | grep ${ROOT_DISK} | awk '{print $2}')
echo "Root disk: $ROOT_DISK, UUID: $ROOT_DISK_UUID"

echo ">>>> Configuring nova-local"
NOVA_SIZE=34
NOVA_PARTITION=$(system host-disk-partition-add -t lvm_phys_vol ${COMPUTE} ${ROOT_DISK_UUID} ${NOVA_SIZE})
NOVA_PARTITION_UUID=$(echo ${NOVA_PARTITION} | grep -ow "| uuid | [a-z0-9\-]* |" | awk '{print $4}')
system host-lvg-add ${COMPUTE} nova-local
system host-pv-add ${COMPUTE} nova-local ${NOVA_PARTITION_UUID}
sleep 2

echo ">>> Wait for partition $NOVA_PARTITION_UUID to be ready."
while true; do system host-disk-partition-list $COMPUTE --nowrap | grep $NOVA_PARTITION_UUID | grep Ready; if [ $? -eq 0 ]; then break; fi; sleep 1; done
Unlock controller-0
Unlock controller-0 in order to bring it into service:
system host-unlock controller-0
Controller-0 will reboot in order to apply configuration change and come into service. This can take 5-10 minutes, depending on the performance of the host machine.
When it completes, your Kubernetes cluster is up and running.
Access StarlingX Kubernetes
Use local/remote CLIs, GUIs, and/or REST APIs to access and manage StarlingX Kubernetes and hosted containerized applications. Refer to details on accessing the StarlingX Kubernetes cluster in the Access StarlingX Kubernetes guide.
StarlingX OpenStack
Install StarlingX OpenStack
Other than the OpenStack-specific configurations required in the underlying StarlingX/Kubernetes infrastructure (described in the installation steps for the StarlingX Kubernetes platform above), the installation of containerized OpenStack for StarlingX is independent of deployment configuration. Refer to the Install OpenStack guide for installation instructions.
Access StarlingX OpenStack
Use local/remote CLIs, GUIs and/or REST APIs to access and manage StarlingX OpenStack and hosted virtualized applications. Refer to details on accessing StarlingX OpenStack in the Access StarlingX OpenStack guide.
Uninstall StarlingX OpenStack
Refer to the Uninstall OpenStack guide for instructions on how to uninstall and delete the OpenStack application.
